Sunday 23 June 2013

Nail Polish Organisation

I never really kept my nail polishes organised nicely and neatly because I never really had anywhere to put them all. However, recently this all changed when I bought a shelf exclusively for my nail polishes, I chose a shelf made by String.

This meant I finally could organise all my nail polishes nicely and in a way that it would be easy to find whatever I was looking for.


String shelf with nail polish

 I decided to go for colour coding rather than organising by brand and I think that was the best way to do it! 

Colour coded nail polish on string shelf

The nail polishes are lined up 3 deep. No more time wasted searching for the right colour!

Organised Nail Polish

Hues of Pink
I have a lot of pinks!

Anyone have any better ways of organising their polishes?

Thanks for reading!
M

Saturday 22 June 2013

Midsummer Dream

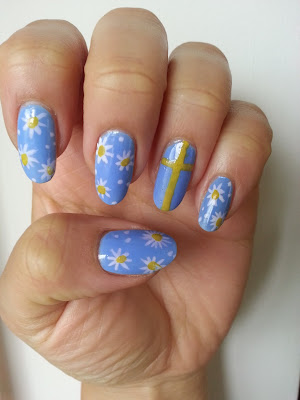
Being half swedish and going to a Midsummer celebration it was of course vital to paint my nails accordingly! I thought about what would really represent Swedish midsummer and naturally I came to the conclusion I needed flowers and Swedish flags! I decided to go for daisy style flowers on a blue background as that felt more summery and a bit more Swedish than other flower manis I've created before.

Flower Nail Art
Summery and Swedish!

\Summer Nail Art

Midsummer Nail Art, Flowers and Swedish Flag Manicure

Midsommar Nail Art

This was easy to do - the Swedish flags were probably the harder bits, I included a picture of the mani pre-swedish flag as I think this would be cute for any time of year without it, not just midsummer!
Daisy Flower Nail Art
Pre-Swedish Flag


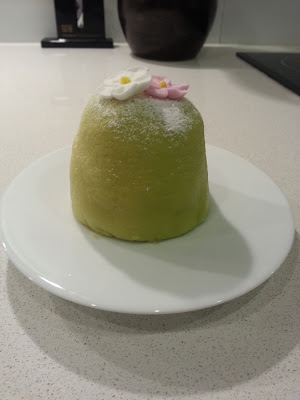
prinsesstårta, Prinsesstarta Cupcakes
I also made prinsesstarta cupcakes!


Thanks for reading!
M


Sunday 19 May 2013

Matte and Gloss Leopard Print

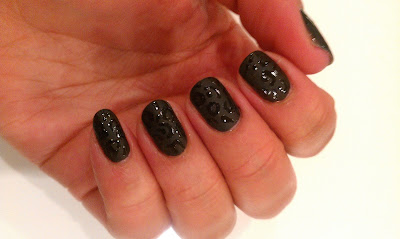
I've done a few different variations on leopard print nails, and this is a very subtle version that I came up with, matte and gloss black leopard print.
This manicure was quite a hard one to get good pictures of, I hopefully have managed to show the leopard print here, but trust me, the effect is much better in real life!

Leopard Print Mani

Black Leopard Print Nail Art

Leopard Print Nails

Matte and Gloss Leopard Print Mani

In order to create this mani, I painted my nails with a couple of layers of black nail polish as my basecoat, waited for it to dry then added a matte topcoat. Once that had dried, I painted on the leopard pattern with a nail art brush, using a gloss topcoat nail polish.

I love this mani, though I must say, with all matte polish I've used, the matte effect seems to dull down with time - especially if you use a moisturiser regularly - so this is not a long lasting mani!

Any tips for how to keep a matte mani matte?


Thanks for reading!
M

All Hallows' Eve

So yes, I know this is a little late for a Halloween post (a lot late!!) but I still wanted to share the nail art I had going on for Halloween because I loved it and I LOVE Halloween! I actually did two different manis, one for the build up to Halloween and one for Halloween itself.

The Pre-Halloween Mani

Blood Drop Halloween Nail Art
Bloody Talons
Sorry for the terrible picture quality, I forgot to get a good picture and just ended up taking one at work! I had seen this mani style quite a bit, usually the paired with pastel colours or made to look like ice-cream cones, and I thought it could be quite a fun Halloween mani if I had my nails look like they were dripping blood. I quite liked the outcome and may do it again next halloween - though as you can see I evidently didn't give the red enough time to dry before I put a topcoat on - which meant the red bled a bit into the undercoat.

 The Halloween Mani

 For my Halloween nails I decided on black (of course!) with three accent nails - one cobweb, and a two nail skeleton. 

Halloween cobweb manicure
Cobwebs and Skeletons!
Skeleton Nail Art
Whole Skeleton

Halloween Manicure Skeleton and Spiderweb Nail Art

I used a black undercoat as my base, and for the spooky accents I used a white nail art pen. To create the cobweb, I drew three straight lines originating from the same point going outwards, I then connected those with slightly curved lines between each of the initial ones to create a cobweb like look.
The skeleton was a little harder to paint, I started with the spine, skull and pelvis, then added the arms ribs and legs (not very anatomically correct though, hehe!).

I loved both these manicures, and I am already excited thinking about what to do this year! Anybody got any good Halloween ideas yet?


Thanks for reading!
M


Sunday 5 August 2012

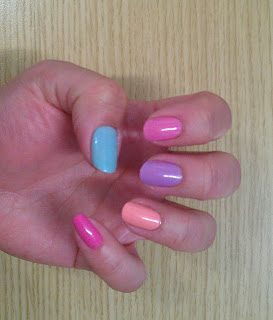
Pastel Fun

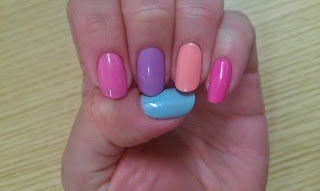
Before I ever ventured into real nail art, I have played around with painting each of my nails a different colour.  I think a even a single accent nail in a different colour can really pull a manicure forward and make it a little more exciting. This is a more subtle way to do nail art, and I feel more appropriate if you don't want to go too far with it or can't for work etc.

Pastel Manicure

Pastel Nail Art

I had usually done multi coloured nails picking one  colour, and then painting my nails variations of that colour. This time I went a little bolder and chose just pastel as the theme, with completely different colours on each nail.
I love pastel nail polish and I love this mani. I would like to get hold of a pastel yellow and green, I think it would be nice to switch out the pink on my pinky for a colour like that.


Thanks for reading!
M


Tuesday 24 July 2012

Mini Polka


I have played around with my dotting tools quite a bit, and decided to try a slightly more difficult polka dotted pattern (just smaller dots really). I selected black as a basecoat and paired it with a soft pink, as I wanted it to almost appear as black and white, but maybe a little warmer in colour. Please ignore my cuticle on my thumb, TERRIBLE!


Polka Dot ManicurePolka Dot Nail Art


I liked how this mani reminded me of close up pictures of fly's eyes, (weird huh?). 
It was difficult to keep the polka dots uniform, and I think occasionally I ended up with slightly larger dots, as you can probably see in the pictures. Despite that, I loved this mani, I think it was quite eye catching from far away, and close up quite impressive. It wasn't too difficult to do, but required quite a bit of time and concentration as well as a steady hand! Well worth the effort though!


Thanks for reading!
M
Geo


This is my first attempt at using taping to create a geometric multicoloured pattern. It was a slow and quite difficult process, and I can’t say that I loved the outcome, but I am most definitely going to be trying it again, as I know this mani has lots of potential.

Geometric ManicureGeometric Nail Art


As with all manis I do that require taping, I use just regular tape that I cut into strips, as I have yet to find a nail tape that is not too sticky (I feel like really sticky tape tends to mess up manis I do with them).  However, this means that often times the width of any stripes are not quite the same, so I am still on the hunt for perfect nail tape that doesn’t hold on too strong.
Anyway, I do quite like the finished result, I like the colours I put together here, and I am excited to try this again with a new colour palette.


Thanks for reading!
M